This chapter contains the following topics:
Printing a Year-End Payroll Report
State and Federal User-Defined Reporting
Run this selection at the end of the year to print the Year-End Payroll Report and handle your W-2, W-3 and 1099 processing.
|
Note |
For those using the separate commission check feature: If you purge Payroll history at the end of the year (or at any time during the year) and if commissions are paid by separate checks other than the regular payroll, be sure not to purge the history for the periods that the commissions are drawn. For example, if you pay commissions on January 15 for commissions earned during October to December, do not purge October to December history until the January 15 payroll in processed. |
For W-2 and W-3 Reporting
| • | Refer to the Employees chapter in this documentation for information regarding the Employee Name Format. A change to the reporting requirements for tax year 2001 and 2014 required special formatting of employee names to ensure proper alignment on Form W-2 and writing to the magnetic media file. |
| • | Enter additional information, if applicable, for each employee for reporting on W-2 forms or a formatted W-2 wage file. See Entering W-2 Information |
| • | Print a list of employee additional information. See Printing W-2 Information |
| • | Print W-2 forms on preprinted, continuous or laser forms, or output them to a file for submission as a formatted wage file. A W-3 may also be printed and the information for the W-3 is provided on the last screen. W-2s are provided to your employees and along with a W-3, are sent to the Social Security Administration. |
For 1099-MISC forms
| • | Enter additional information, if applicable, for each non-employee reporting 1099 information |
| • | Print the 1099 Information Report for non-employees. |
| • | Print 1099-MISC forms on preprinted, continuous or laser forms, or output them to a file. |
| • | For paper 1099-MISC forms, get the information required to fill out form 1096 that you must send with your paper 1099-MISC forms to the IRS. |
|
Note |
At year-end, you should produce Federal W-2 Wage and Tax Reports, as well as any 1099 Miscellaneous Reports, for the year just ended, as soon as possible. The software allows you to continue to process current payroll time transactions and any adjustments until March 31st of the new year. The software does not allow you to process any checks dated later than this, unless you first close the year for payroll. Payroll history and quarterly figures are accumulated for checks processed for the new year dated before March 31st. |
This selection prints the Year-End Payroll Report, that is used to verify the information that is printed on the W-2 forms.
If an employee has a term insurance premium, the report shows the dollar amount that is added to the employee’s FWT gross, Social Security gross, and Medicare gross when printing W-2 forms.
Non-employees and regular employees with no wages for the year will not print on the report. Non-employees should receive a Form 1099 based on the report covered in the Printing 1099 Information section.
If the employee has elected to make deductions to both the regular and Roth 401(k), they are accumulated in the one field.
See a Year-end Payroll report example in the Form and Report Examples appendix.
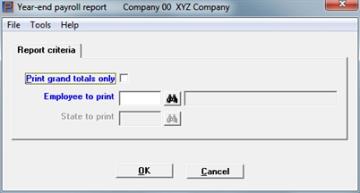
Select
Year-end payroll from the Reports, General menu.
The following screen displays:
Graphical Mode
Character Mode
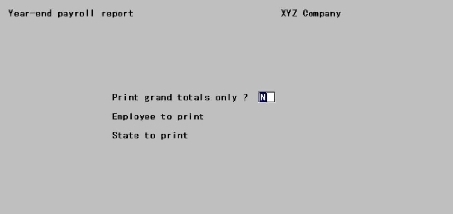
Leave the box unchecked or use the default of N to print a Year-End Payroll Report for "All" or to select only one employee, If "All" employees is selected an accumulation is reported for employee grand totals.
Check this box or enter Y to print only the latter. The Employee to print and State to print fields cannot be entered which means that all employees and states will be included in the grand totals.
|
Format |
Graphical: Check box where checked is yes and unchecked is no. The default is unchecked Character: One letter, either Y or N. The default is N |
|
Example |
Press <Enter> |
This field is automatically selected and set to "All" and cannot be changed if you checked the box or entered Y to the first field.
Options
Otherwise, enter the employee number for this report, or use the option:
|
<F5> |
For "All" employees |
|
Format |
999999 |
|
Example |
Press <F5> |
This field is automatically set:
| • | to "All" if you checked the box or entered Y to the Print grand totals only field. |
| • | to un-enterable if you specified an individual employee in the preceding field. |
In both cases this field is not entered and cannot be changed.
Options
Otherwise, enter the code of the state for which you want to print a report, or use the option:
|
<F5> |
For "All" states |
If the state tax code is not in Tax tables, an error message displays.
|
Format |
Two characters |
|
Example |
Press <F5> |
Select OK to print the report or Cancel to not print and return to the menu.
Character Mode
Any change ?
Answer Y to re-enter the screen, or N to print the report.
The Passport Business Solutions Payroll module automates the majority of your reporting needs as an employer by accumulating wage and tax amounts for each employee as you pay them their weekly, monthly or otherwise payroll checks throughout the year.
Some of the information entered on this screen will also print on the W-3 form.
There are several different tax authorities to whom taxes are due and with whom you as an employer are expected to file various reports on a periodic basis.
The primary tax reports you are expected to file are annual wage and tax statements to employees, known more familiarly as W-2s. The PBS Payroll module also allows you to pay non-employee compensation which is generally reportable on form 1099-MISC.
Although, as described above, much of the information you must report is accumulated for you, the full requirements of W-2 reporting go beyond the scope of the day-to-day operations of the payroll system.
Many of these fields may not be applicable to your situation. In this case just press <Enter> for the field to set it to zero. In fact, after reviewing this screen and the next one, which can be used for state and federal information, if none of the fields are applicable to your reporting needs then you do not need to use this function at all. In this case all the information you are required to report has been accumulated for you within the main body of the PBS Payroll system.
To enable you to effectively use the payroll system for W-2 reporting, this function allows you to record additional employee information in a temporary file so that it is available to the W-2 reporting functions.
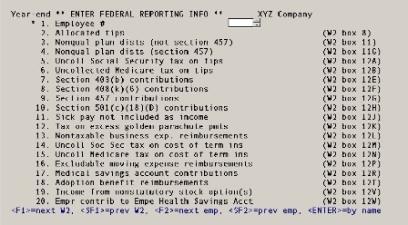
The first screen contains information entry fields that correspond to the W-2 form by box number. Refer to the IRS instructions for filling out W-2 forms for information on each of these fields. The IRS instructions refer to these fields by referencing the W-2 box number. Each field on the screen is followed by the corresponding W-2 box number.
The second allows you to report amounts for both state and federal box 14 and states text for box 15 for of the W-2 form. This box is provided for anything additional you want to report that is not covered elsewhere on the form.
A typical use for this would be the reporting of an additional state tax that your employees are required to pay but which may vary from state to state. In many cases there is no such tax and so you would not have to report anything in box 14.
Additional Federal information can be entered in 2 ways. One as the user defined fields as part of state information or two as additional Federal information that prints on a separate W-2.
If you need to run this function, start as follows:
Select
Enter W-2 information from the Year-end menu.
The first screen similar to the following appears:
From this screen you can work with both new and existing W-2 information records. If one has already been entered for the employee number you specify, it displays and is available for changes or deletion.
Enter the following information:
* 1. Employee #
For a new W-2 information record
Options
Enter the number of the employee for whom to enter W-2 information or use one of the options:
|
<F2> |
For next employee, in employee number sequence |
|
<SF2> |
For previous employee |
|
Blank |
To look up employees by name |
If you choose to enter by name, the cursor moves to the name field and lets you enter an employee name (or just the leading characters of one). Upper / lower case is significant. Your options at this point become:
|
<F2> |
For next employee, in employee name sequence |
|
<SF2> |
For previous employee |
|
Blank |
To return to looking up employees by number |
The employee entered must exist in Employees and must also have been paid at least one check during the year.
W-2 forms cannot be printed for non-employees. If you enter the number of a non-employee, an error message displays.
For an existing W-2 information record
Options
Enter the employee number whose W-2 information you want to change or delete, or use the option:
|
<F1> |
For next entry |
|
<SF1> |
For previous entry |
|
Format |
999999 |
|
Example |
Type 1 |
2. Allocated tips (W2 box 8)
This field is required for tipped employees of certain food and beverage establishments above a certain size. Refer to the appropriate IRS publication for information on calculating this amount for each of your tipped employees.
Options
Enter the dollar amount or use the option:
|
<F2> |
To set this field and all remaining fields to zero |
|
Format |
999999999.99 |
|
Example |
Press <Enter> |
3. Nonqual plan dists (not section 457) (W2 box 11)
This field is for reporting distributions from non-qualified plans that are not section 457 plans. Follow the IRS W-2 instructions.
Options
Enter the dollar amount or use the option:
|
<F2> |
To set this field and all remaining fields to zero |
|
Format |
9999 999.99 |
|
Example |
Press <Enter> |
4. Nonqual plan dists (section 457) (W2 box 11G)
This field is for reporting distributions from non-qualified plans that are section 457 plans. Follow the IRS W-2 instructions.
Options
Enter the dollar amount or use the option:
|
<F2> |
To set this field and all remaining fields to zero |
|
Format |
9999999.99 |
|
Example |
Press <Enter> |
5. Uncoll social security tax on tips (W2 box 12A)
If you could not collect all the social security tax due on an employee’s tips out of their paychecks, report this amount here. Follow the IRS W-2 instructions.
Options
Enter the dollar amount or use the option:
|
<F2> |
To set this field and all remaining fields to zero |
|
Format |
9999999.99 |
|
Example |
Press <Enter> |
6. Uncollected Medicare tax on tips (W2 box 12B)
If you could not collect all the Medicare tax due on an employee’s tips out of their paychecks, report this amount here. Follow the IRS W-2 instructions.
Options
Enter the dollar amount or use the option:
|
<F2> |
To set this field and all remaining fields to zero |
|
Format |
9999999.99 |
|
Example |
Press <Enter> |
7. Section 403(b) contributions (W2 box 12E)
This field is for reporting employee contributions to a deferred compensation plan according to section 403(b) of the IRS code. Follow the IRS W-2 instructions.
Options
Enter the dollar amount or use the option:
|
<F2> |
To set this field and all remaining fields to zero |
|
Format |
9999999.99 |
|
Example |
Press <Enter> |
8. Section 408(k)(6) contributions (W2 box 12F)
This field is for reporting employee contributions to a deferred compensation plan according to section 408(k)(6) of the IRS code. Follow the IRS W-2 instructions.
Options
Enter the dollar amount or use the option:
|
<F2> |
To set this field and all remaining fields to zero |
|
Format |
9999999.99 |
|
Example |
Press <Enter> |
9. Section 457 contributions (W2 box 12G)
This field is for reporting employee contributions to a deferred compensation plan according to section 457 of the IRS code. Follow the IRS W-2 instructions.
Options
Enter the dollar amount or use the option:
|
<F2> |
To set this field and all remaining fields to zero |
|
Format |
9999999.99 |
|
Example |
Press <Enter> |
10. Section 501(c)(18)(d) contributions (W2 box 12H)
This field is for reporting employee contributions to a deferred compensation plan according to section 501(c)(18)(D) of the IRS code. Follow the IRS W-2 instructions.
Options
Enter the dollar amount or use the option:
|
<F2> |
To set this field and all remaining fields to zero |
|
Format |
9999999.99 |
|
Example |
Press <Enter> |
11. Sick pay not included as income (W2 box 12J)
When an employee contributes to a sick pay plan and then receives sick pay, such sick pay is not included as income. Report this in this box. Follow the IRS W-2 instructions.
Options
Enter the dollar amount or use the option:
|
<F2> |
To set this field and all remaining fields to zero |
|
Format |
9999999.99 |
|
Example |
Press <Enter> |
12. Tax on excess Golden Parachute Pmts (W2 box 12K)
This field applies only for employees who have received excess golden parachute payments. Follow the IRS W-2 instructions.
Options
Enter the dollar amount or use the option:
|
<F2> |
To set this field and all remaining fields to zero |
|
Format |
9999999.99 |
|
Example |
Press <Enter> |
13. Nontaxable business exp. reimbursements (W2 box 12L)
This field applies to employees who receive reimbursement for business expenses. Follow the IRS W-2 instructions.
Options
Enter the dollar amount or use the option:
|
<F2> |
To set this field and all remaining fields to zero |
|
Format |
9999999.99 |
|
Example |
Press <Enter> |
14. Uncoll Soc Sec tax on cost of term ins (W2 box 12M)
Use this field to report uncollected Social Security tax on the cost of group-term life insurance coverage, generally above $50,000, which you provided to your former employees, including retirees. Follow the IRS W-2 instructions.
Options
Enter the dollar amount or use the option:
|
<F2> |
To set this field and all remaining fields to zero |
|
Format |
9999999.99 |
|
Example |
Press <Enter> |
15. Uncoll Medicare tax on cost of term ins (W2 box 12N)
Use this field to report uncollected Medicare tax on the cost of group-term life insurance coverage, generally above $50,000, that you provided to former employees, including retirees. Follow the IRS W-2 instructions.
Options
Enter the dollar amount or use the option:
|
<F2> |
To set this field and all remaining fields to zero |
|
Format |
9999999.99 |
|
Example |
Press <Enter> |
16. Excludable moving expense reimbursements (W2 box 12P)
This field applies to employees who receive moving expenses that are excludable from income. Follow the IRS W-2 instructions.
Options
Enter the dollar amount or use the option:
|
<F2> |
To set this field and all remaining fields to zero |
|
Format |
9999999.99 |
|
Example |
Press <Enter> |
17. Medical Savings account contributions (W2 box 12R)
Options
This field applies to employees entitled to exclude income deposited in a medical savings account. Follow the IRS W-2 instructions. Enter the dollar amount or use the option:
|
<F2> |
To set this field and all remaining fields to zero |
|
Format |
9999999.99 |
|
Example |
Press <Enter> |
18. Adoption benefit reimbursements (W2 box 12T)
Options
This field applies to employees entitled to exclude certain adoption expenses from income. Follow the IRS W-2 instructions. Enter the dollar amount or use the option:
|
<F2> |
To set this field and all remaining fields to zero |
|
Format |
9999999.99 |
|
Example |
Press <Enter> |
19. Income from nonstatutory stock option(s) (W2 box 12V)
This field applies to income from exercise of nonstatutory stock options. Follow the IRS W-2 instructions. Enter the dollar amount or use the option:
|
Format |
9999999.99 |
|
Example |
Press <Enter> |
20. Empr contrib to Empe Health Savings Acct (W2 box 12V)
This field applies to the employer contributions made to the employee Health Savings Account. Follow the IRS W-2 instructions. Enter the dollar amount or use the option:
|
Format |
9999999.99 |
|
Example |
Press <Enter> |
Field number to change ?
If this is a new entry, the Check Marks for W-2 box 13 window (described in the next section) displays at this point. Only after you have entered this window are you positioned at Field number to change ?.
If this is an existing entry, you are positioned at Field number to change ? first, and can view the window if desired.
Options
In both cases, make any needed changes, or use one of the options:
|
<F1> |
For the next W-2 entry |
|
<SF1> |
For the previous W-2 entry |
|
<F3> |
To delete this entry |
|
<F6> |
To view W-2 box 13 |
|
<F7> |
To enter W-2 box 10, box 12Q, 12Y and AA through EE. Also to view computed box 12 C, 12D, and box 14 |
|
<Enter> and Y |
To enter/change state box 14, state box 15 text and Federal return box 14. |
The <F1>, <SF1>, and <F6> options are available only if this is an existing entry.
The <F6> and <F7> options are discussed in separate sections below. They cause a window to appear for viewing and changing additional information about this entry.
Press <Enter>. You are asked:
Enter/change state W-2 and Fed box 14 reporting information ?
If you need to report additional state information in box 14 and text in box 15 of the W-2 form for this employee, answer Y. Also select Y to add additional box 14 Federal information. To terminate this entry and proceed to another employee, answer N. See State and Federal User-Defined Reporting
These fields can be viewed by pressing <F6>. This lets you set check marks for some of the items in Box 13 of the W-2 form, which contains the following check boxes:
|
Statutory employee |
Enter Y if there are earnings subject to Social Security tax and medicare tax but not Federal income tax. See IRS publications 15 and 15-A for details about Statutory employees. |
|
Third-party sick pay |
Y if you are a third-party sick pay payer filing a W-2 for an insured’s employee. |
|
Retirement plan |
This field is display-only and cannot be changed here. It is automatically set for an employee that was an active participant throughout the year in a retirement plan, except nonqualified plans or 457 plans. |
All of these items are initially set to N, meaning do not check the box. To check a box, move the highlight to the box item by pressing <Up> or <Down> and then pressing <F1>. To remove a check, press <F1> again on that box item.
|
Note |
Your response to “Third-party sick pay” here only affects the Form W-2 for this employee. Your response here also supersedes your response to “8. Third-party sick payer ?” in the Print W-2 and W-3 forms selection and to “13. Third-party sick payer ?” in the Magnetic W-2 forms selection. See Printing W-2 and W-3 Forms and Formatted W-2 Wage File for additional information. |
When you are done setting the optional items, press <Esc> to clear the window.
These fields can be accessed by pressing <F7>.
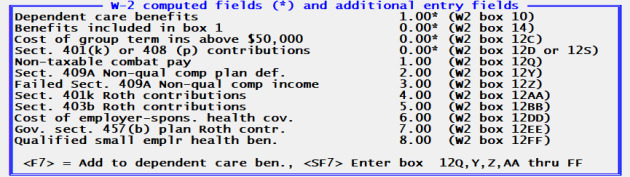
Several of the fields must be entered manually while the others are computed fields for your information only. The computed fields have asterisks to the right of the amounts.
To access and enter the additional dependent care benefits select <F7>.
To enter W-2 box 10, box 12Q, 12Y and AA through EE fields select <SF7>.
|
<F7> |
To enter additional Dependent Care Benefits |
|
<SF7> |
To enter amounts for Boxes Q, Y, Z, AA, BB, DD and EE |
|
<Esc> |
Exit window |
Dependent care benefits (W-2 box 10)
Box 10 is made up of two fields. The first field is accessed by entering <F7> and it allows you add additional Dependent Care Benefits to the computed amount. The computed amount field shows amounts paid for dependent care for an employee above a certain limit and this field cannot be changed. Dependent care benefits are entered as earnings/deductions and are posted to the payroll history after printing checks.
|
Format |
9999999.99 |
|
Example |
Press <Enter> |
Any change ?
Select Y to re-enter the amount or N to accept the amount entered.
Benefits included in box 1 (W-2 box 14)
This field shows the total of benefits provided to the employee that have been reported as part of the box 1 amount for wages, tips, and other compensation. Benefits included in box 1 are entered as earnings/deductions and are posted to the payroll history after printing checks.
Cost of group term ins above $50,000 (W-2 box 12C)
This field shows the value contained in the employee’s record for the employee W-2 ins premium field. The value displayed here can be changed using Employees.
Section 401(k) or 408(p) contributions (W-2 box 12D or 12S)
This field shows the value of elective deferrals for the employee. Elective deferrals are calculated amounts and are posted to payroll history after printing checks. These can be for either a 401(k) or a 408(p) plan, depending on your answer to the question Simple IRA 408(p) plan in Control information.
Non-taxable combat pay (W-2 box 12Q)
Enter the non-taxable combat pay. The amount of your non-taxable combat pay will be shown on the Form W-2, in box 14, with Code Q.
|
Format |
9999999.99 |
|
Example |
Press <Enter> |
Sect. 409A Non-qual comp plan deferral (W-2 box 12Y)
Enter the non-qualified compensation deferral amount.
|
Format |
9999999.99 |
|
Example |
Press <Enter> |
Failed Sect. 409A Non-qual comp income (W-2 box 12Z)
Enter the income under a nonqualified deferred compensation plan that fails to satisfy section 409A.
|
Format |
9999999.99 |
|
Example |
Press <Enter> |
Sect. 401k Roth contributions (W-2 box 12AA)
Enter the Roth contributions income.
Before editing this field, the amount displays as zero. When checks are written which include Roth 401(k) deferral amounts, the Quarter-to-Date History stores this information. When you edit this field the deferral amount from the Quarter-to-Date History defaults. You MUST edit the field manually for this to happen. You may override the defaulted amount.
|
Format |
9999999.99 |
|
Example |
Press <Enter> |
Designated Roth contributions are a type of contribution that can be accepted by new or existing 401(k) or 403(b) plans. This feature is permitted under a Code section added by the Economic Growth and Tax Relief Reconciliation Act of 2001 (EGTRRA), effective for years beginning on or after January 1, 2006. If a plan adopts this feature, employees can designate some or all of their elective contributions as designated Roth contributions, (which are included in gross income) rather than traditional, pre-tax elective contributions. So, starting in 2006, elective contributions come in two types: traditional, pre-tax elective contributions (elective contributions are also referred to as elective deferrals) and designated Roth contributions.
Sect. 403b Roth contributions (W-2 box 12BB)
Enter the Roth contributions salary reduction amount.
|
Format |
9999999.99 |
|
Example |
Press <Enter> |
See above for an explanation of Roth contributions.
Cost of employer-spons. health cov. (W-2 box 12DD)
Enter the cost of the employer sponsored health coverage.
|
Format |
9999999.99 |
|
Example |
Press <Enter> |
Gov. sect. 457(b) plan Roth contr. (W-2 box 12EE)
Enter the amount of the 457(b) plan Roth contributions. An organization that can establish this plan is a state or local government or a tax-exempt organization under IRC 501(c). For more information search on the www.irs.gov web site.
|
Format |
9999999.99 |
|
Example |
Press <Enter> |
Qualified small emplr health ben. (W-2 box 12FF)
This code reports the total amount of permitted benefits under a qualified small employer health reimbursement arrangement (QSEHRA). These QSEHRAs allow eligible employers to pay or reimburse medical care expenses of eligible employees after the employees provide proof of coverage. The maximum reimbursement for an eligible employee under a QSEHRA is $4,950 ($10,000 if it also provides reimbursements for family members), before indexing for inflation. These amounts are for 2017 and can change yearly. For more information, see the 21st Century Cures Act, Public Law 114–255, Division C, Section 18001. Also, for more information search on the www.irs.gov web site.
Any change ?
Select Y to re-enter the amount or N to accept the amount entered.
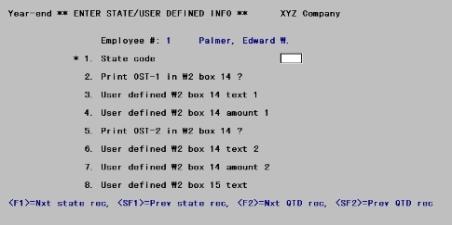
This screen is viewed by answering Y to the question, Enter / change state W-2 and Fed box 14 reporting information ?. It allows you to report additional information in box 14 and enter text for the state in box 15 for this employee.
|
Note |
Entering State and Federal Data When you specify a state code in field 1, the data you enter in user-defined text fields 3 & 6 and amount 4 & 7 can be used for ANY box 14 reporting - even data for Federal reporting. You should use these fields before entering additional box 14 Federal information. Also keep in mind that when you leave field one blank to enter additional Federal information, that an another W-2 prints in which many fields are blank. The additional Federal information you enter and what is printed is intended primarily as information for the employee. |
There can be multiple records for an employee — one for each state and federal information, and one for federal information. The following screen displays:
From this screen you can work with both new and existing entries.
1. State code
Enter the abbreviation of the state for which you wish to enter additional information.
A state can be entered only when there exists quarter-to-date information for that state and that employee. If a state tax table has been assigned to an employee in the Employees selection, but no history has yet accumulated for that state, you will not be able to enter it here.
Entering NJ for New Jersey changes the display of the screen. For entering additional New Jersey tax information, go to New Jersey Other State Taxes.
Options
You may also use one of the options:
|
<F1> |
For the next existing entry (federal or state) for this employee |
|
<SF1> |
For the previous existing entry for this employee |
|
<F2> |
For the next state for which QTD information exists for this employee (whether or not this corresponds to an existing entry for this employee in this selection) |
|
<SF2> |
For the previous state for which there is QTD information |
|
<Enter> |
For additional federal information. Note that when data is entered this way, an additional W-2 will print. |
|
Format |
Two characters |
2. Print OST-1 in W2 box 14 ?
If the 1. State code field is blank, this field displays as Not applicable because what you are entering is Federal information.
Many states impose income tax on employees. This can be reported on the employee's W-2 form. In addition to income tax, some states impose additional taxes or other taxes which sometimes must be reported. If this is the case for the selected employee, answering Y to this question will cause the "other state tax 1" to be printed in box 14 of the W-2 form.
Otherwise, specify whether you want to print the first other state tax in this box.
|
Format |
One letter, either Y or N |
3. User defined W2 box 14 text 1
If Field #2 is Y, this field displays as Not applicable.
Otherwise, Box 14 is available for any amounts that you track manually outside of the payroll system (for instance, charitable contributions or pension plan contributions). If you choose to do this, enter a description here of what amount you are entering. The amount and its description will be printed in box 14 of the W-2 form.
|
Format |
15 characters |
4. User defined W2 box 14 amount 1
If Field #2 is Y, this field displays as Not applicable.
If Field #3 is not entered, the cursor skips this field and it is left blank. Otherwise, enter the amount of whatever you have described in Field #3. You may enter zero.
|
Format |
9999999.99 |
5. Print OST-2 in W2 box 14 ?
If Field #1 is blank, this field displays as Not applicable because what you are entering is Federal information.
Many states impose income tax on employees. This can be reported on the employee's W-2 form. In addition to income tax, some states impose additional taxes or other taxes which sometimes must be reported. If this is the case for the selected employee, answering Y to this question will cause the "other state tax 2" to be printed in box 14 of the W-2 form.
Otherwise, specify whether you want to print the second other state tax in this box.
|
Format |
One letter, either Y or N |
6. User defined W2 box 14 text 2
If Field #5 is Y, this field displays as Not applicable.
Otherwise, the remainder of Box 14 is available for any amounts that you track manually outside of the payroll system (for instance, charitable contributions or pension plan contributions). If you choose to do this, enter a description here of what amount you are entering. The amount and its description will be printed in box 14 of the W-2 form.
It is not necessary that the same information be entered in the same field for each employee. For example, an employee who commutes from out of state might have his other state tax entered in the top portion of Box 14 while his charitable contributions appeared lower down in the same box. An employee who resides in-state would have only a charitable contribution, which you might want to place at the top of Box 14. Alternately, you might wish for the sake of consistency to enter charitable contributions in Field #6 in both cases.
|
Format |
15 characters |
7. User defined W2 box 14 amount 2
If Field #2 is Y, this field displays as Not applicable.
If Field #6 is not entered, the cursor skips this field and it is left blank. Otherwise, enter the amount of whatever you have described in Field #6. You can enter zero.
|
Format |
9999999.99 |
8. User defined W2 box 15 text
If Field #1 is blank, this field displays as Not applicable because what you are entering is Federal information.
This field is optional. It is provided so that you can enter text on the second line in box 15 of the W-2 form. This field prints on the second line of box 15 along with the calculated state tax wages, tips, etc. The first line of box 15 contains the accumulated state information with amounts and when used, the accumulated local tax information with amounts.
|
Note |
New Jersey requires the state employer registration number on New Jersey W-2. This number can be entered in this field. |
Options
Except for the first entry of the session, you can also use the option:
|
<F2> |
For the same text as the previous entry |
|
Format |
18 characters |
Field number to change ?
Options
Make any needed changes. Press <Enter> to process another new or existing entry for this employee. For an existing entry, you can also use one of the options:
|
<F1> |
For the next existing entry (federal or state) for this employee |
|
<SF1> |
For the previous existing entry for this employee |
|
<F3> |
To delete this entry |
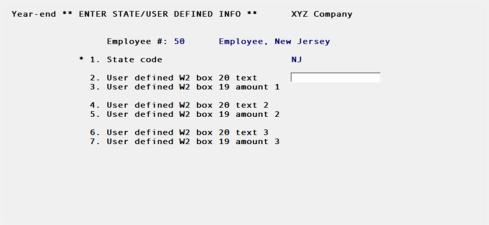
For the state of New Jersey you may enter three sets of texts that print in box 20 and with corresponding amounts that print in box 19 on the W-2. In order to enter the other state tax fields for New Jersey, you must enter NJ in the State code field 1.
Printing New Jersey W-2s
When printing the data for New Jersey, only select the single form. It is programmed to fit in a standard single W-3 form.
Because the font type changes for some fields, do not select a Windows only printer. You must print to a Company information laser printer or dot matrix printer. If you are using a dot matrix printer, you must set up the Company information printer type as Epson.
City taxes will not print on a New Jersey W-2.
When you do the following screen displays:
Enter the following fields:
2. User defined W2 box 20 text
Enter text to describe the other state tax 1.
|
Format |
15 characters |
3. User defined W2 box 19 amount 1
Enter the amount that matches the description from the previous field.
|
Format |
9999999.99 |
4. User defined W2 box 20 text 2
Enter text to describe the other state tax 2.
|
Format |
15 characters |
5. User defined W2 box 19 amount 2
Enter the amount that matches the description from the previous field.
|
Format |
9999999.99 |
6. User defined W2 box 20 text 3
Enter text to describe the other state tax 3.
|
Format |
15 characters |
7. User defined W2 box 19 amount 3
Enter the amount that matches the description from the previous field.
|
Format |
9999999.99 |
Field number to change ?
Options
Make any needed changes. Press <Enter> to process another new or existing entry for this employee. For an existing entry, you can also use one of the options:
|
<F1> |
For the next existing entry (federal or state) for this employee |
|
<SF1> |
For the previous existing entry for this employee |
|
<F3> |
To delete this entry |
This selection prints the information you entered in Enter W-2 information. It does not print all the employee's year-end W-2 information. For more employee year-end payroll information you may also run the Year-end payroll report.
Select
Print W-2 information from the Year-end menu.
The following screen displays:
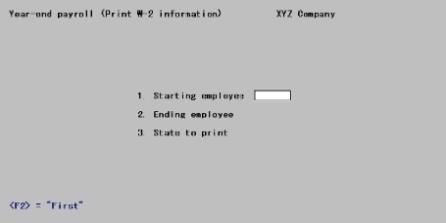
1. Starting employee and
2. Ending employee
Options
Enter the range of employee numbers for whom to print W-2 form information, or use the option:
|
<F2> |
For the First (at Field #1) or Last (at Field #2) employee number |
|
Format |
999999 at each field |
3. State to print
Options
Enter the code for the state to print, or use one of the options:
|
<F5> |
To print information for All states |
|
Blank |
For none (i.e., to print federal information with no state information) |
|
Format |
Two characters |
|
Note |
If you entered other state tax for the state of New Jersey (see New Jersey Other State Taxes), when selecting to print the W-2 information report the state line prints all 4 groups of box 15 text, and 3 groups of boxes 19 and 20. For employees working in any state other than New Jersey, the report does not change. |
Field number to change ?
Make any needed changes. Press <Enter> to print the report.
If you answered Y in Control information to the questionSimple IRA 408(p) plan :
| • | In W-2’s Box 12, a code S (for SIMPLE plan) will display before the total, instead of D for 401(k). |
This selection prints W-2 and W-3 physical forms. For producing W-2’s on a formatted W-2 wage file, refer to the next section.
If you inputted additional information for each employee we recommend that you run and review Print W-2 information, described in Printing W-2 Information, before proceeding. You may also want to review the Year-end payroll report. See Printing a Year-End Payroll Report.
|
Note |
Refer to the Employees chapter section Employee Name Format for information regarding the format of employee names. Employee names must be formatted correctly or they will not be printed correctly on Form W-2. |
Make sure the Maximum Social Security wages is set to the amount for the tax year that you are printing W-2’s. This is done in the tax tables. See Tax Tables.
Many laser printers by default are set to 66 lines. The program should set the printer to 60 lines, however if it does not, then you must set it yourself.
When printing a W-3:
| • | it prints the Employer's contact person, Employer's telephone number, Employer's fax number and Employer's email address from the Jurisdictions 'RA' record. See Jurisdictions. |
| • | select a range of employees that includes all the employees that are eligible for a W-2. If you leave any employees out of the W-3 printing their amounts will not be part of the W-3 totals. |
If Pennsylvania's Act 32 applies to your company, see the W-2 Printing section of the Pennsylvania Act-32 appendix.
Data Errors
The Social Security Administration will reject a printed W-2 if any of the following data conditions exist:
| • | Medicare wages and tips are less than the sum of social security wages and social security tips |
| • | Social security tax is greater than zero; social security wages and social security tips are equal to zero |
| • | Medicare tax is greater than zero; Medicare wages and tips are equal to zero |
The W-2 printing program checks to see if any of the above conditions exist. If it finds any of these conditions for an employee, that employee is reported on a W-2 Exception Report. This enables you to enter and post an adjustment to handle any Medicare and social security incorrect data conditions.
Select
Print W-2/W3 forms from the Year-end menu.
The following screen displays:
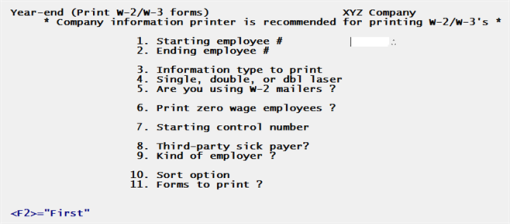
1. Starting employee #
2. Ending employee #
Options
Enter the range of employee numbers for whom to print W-2 forms, or use the option:
|
<F2> |
For the First (at Field #1) or Last (at Field #2) employee number |
|
Format |
999999 at each field |
In order to print the full amounts on a W-3 all the employees must be selected in the above range.
3. Information type to print
Options
The IRS has designed the W-2 form so that you can report both Federal and state & local information at the same time. In order to offer maximum flexibility, this function allows you to choose which type of information to print on your W-2 forms:
|
F |
Print only federal information |
|
S |
Print state and local information |
|
B |
Print both |
If you have employees who work in more than one state during the year, the accumulated totals for these employees are stored by state in Quarter-to-date History by employee number. When W-2s are printed, the federal totals are summed and printed on one W-2 form while the state amounts are printed one-state-to-a-form. You have these options:
| • | You can choose to print only federal totals (F), in which case no state information prints. You can then print state information in a second run (S). |
| • | If all your employees worked only in one state for the year, print both federal and state information (B). |
| • | When you select to print State and local information only the Federal information will not print on a W-3 or on the totals screen. |
|
Format |
One letter from the list above. There is no default. |
4. Single, double, or dbl laser
This field allows you to indicate the format of the W-2 forms you are printing.
Options
Enter one of the options below:
|
S |
To print on single-width W-2 forms. The single-width can be used for either single (80 column) dot matrix W-2 forms or single laser W-2 forms. |
|
D |
To print on double-width W-2 forms. The double width W-2 forms can be used only on a 132 column dot matrix printer. |
|
L |
To print double-laser W-2 forms. The double-laser format prints four copies of an employee’s W-2 on a single portrait page. Be aware that if you choose this format, the IRS requires submission of W-2 data on another format such as a formatted wage file or a single width printer form for a laser or dot matrix printer. |
|
Format |
One letter from the list above. The default is S. |
|
Note |
Double-width W-2 forms, specified as type “D” are available in different formats that may be acceptable to the IRS. The PBS software supports a W-2 form that provides a compressed format for the left-hand copy. Two printing restrictions have been imposed for type “D” forms due to the amount of space available on the compressed copy.
|
If you entered additional Other states taxes using the New Jersey Other State Taxes screen, to print this information on a W-2 select the Single form. It is programmed to fit in a standard (S type) single W-2 form only.
Three compressed lines print in boxes 15 though 19. The first line prints above the dotted line and the last two print below. Samples are provided by the state of New Jersey. Select this link for the samples:
http://www.state.nj.us/treasury/taxation/pdf/other_forms/git-er/m6025_2011.pdf
The examples given are for 2011 forms. Future years will likely be similar. The printing in PBS relates to the alternate sample on page 3. Note that the sample boxes 19 and 20 are not properly sized compared to a true W-2.
The font size changes for some fields so do not select a Windows only printer. You must print to a Company information laser printer or dot matrix printer. If you are using a dot matrix printer, you must set up the Company information printer type like Epson because it responds to font size changes when printing.
For employees working in any state other than New Jersey, the W-2 form does not change.
5. Are you using W-2 mailers ?
Mailer forms are only for printing to a continuous feed dot matrix printer only.
Enter Y if you are printing your W-2 reports on W-2 mailer type forms. Enter N if you are printing your W-2 reports on the non-mailer type of form.
This field is applicable only for single-width W-2 mailer forms.
W-2 mailers enable you to print W-2 reports that are ready for mailing to your employees. In order to do this, the W-2 report is printed with a ¾- inch margin. The result is the data prints ¾- inch further to the right which aligns with the mailer forms.
|
Note |
Some W-2 mailer forms do not have an additional ¾- inch of margin. In this case, enter N for this field. If you are not printing W-2 mailers and Y is entered in this field, the W-2 will print with all information shifted to the right. |
|
Format |
One letter, either Y or N. There is no default. |
6. Print zero wage employees ?
Enter Y to also print W-2 forms for employees who did not receive any FWT or SWT wages during the year. To exclude them, answer N.
|
Format |
One letter, either Y or N. The default is N. |
7. Starting control number
Box (d) of the W-2 form is an identification box. The number printed here identifies the paper W-2 form so that if the IRS has questions about a particular W-2 form it can easily be identified by its control number.
You should start at 1. If you do subsequent printings for more employees note the last number from the previous W-2 printing and start with the next W-2 run with the next number.
|
Format |
9999999 Zero is not allowed. |
8. Third-party sick payer ?
Answer Y here if you are a third-party sick payer printing W-2 forms for an insured’s employees.
|
Format |
One letter, either Y or N. The default is N |
If you answer Y here, Third-party sick pay in W-2 form box 13 will be marked on the W-2 forms unless superseded by an entry in W-2 information for an employee.
If you answer N here, Third-party sick pay in W-2 form box 13 will not be marked on the W-2 forms unless superseded by an entry in W-2 information for an employee.
If you answer Y here you will not be able to print a W-3. This is because PBS Payroll may not have information for printing W-3 boxes 13 For third-party sick pay use only and 14 Income tax withheld by payer of third-party sick pay.
9. Kind of employer ?
Enter the option that applies to you. This option displays on the last screen and prints on your W-3 form, if you choose to print a W-3. It does NOT print on the W-2 forms. You must select one of the following:
|
N |
None apply. This is the default. Use N if none of the other check boxes on the W-3 apply to you. |
|
F |
Federal govt. Enter F if you are a Federal government entity or instrumentality. |
|
S |
State/local non-501c. Enter S if you are a state or local government or instrumentality that is not a tax-exempt section 501(c) organization. |
|
T |
501c non-govt. Enter T if you are a non-governmental tax-exempt section 501(c) organization. |
|
Y |
State/local 501c. Enter Y if you are a dual status state or local government or instrumentality that is also a tax-exempt section 501(c) organization. |
|
Format |
One letter, either N, F, S, T or Y. The default is N |
10. Sort option
Select the order in which you want the W-2s to print. If you are printing a W-3 form only the sort order is not relevant. For printing W-2s enter one of the options below:
|
E |
To print the W-2s in employee number order. |
|
N |
To print the W-2s in employee name order. |
|
S |
To print the W-2s in employee social security number order. |
|
Format |
One letter from the list above. |
Select the form types to print. Enter one of the options below:
|
B |
To print Both W-2s and a W-3 |
|
2 |
To print W-2s only. If you select to print W-2s only you will still be offered an option to print a W-3 from the totals screen |
|
3 |
To print a W-3 only |
|
Format |
One letter or number from the list above. |
If you select to print a W-3 and your employees work in multiple states an X is printed in the W-3 Box 15 State.
12. Kind of payer ?
This field is not available if you entered Y for the Third-party sick payer? field.
Enter the option that applies to your company. if you choose to print a W-3, an X is printed in the kind of payer Box b on the W-3 form.
Refer to the IRS regulations for a description of options for this field: www.irs.gov/pub/irs-pdf/iw2w3.pdf
These are the options:
|
1 |
941 This is the default. |
|
M |
Military |
|
3 |
943 |
|
C |
CT-1 |
|
H |
Household employee |
|
G |
Medicare government employee |
|
Format |
One character, either 1, M, 3, 4, C, H or G. The default is 1 |
Field number to change ?
Make any needed changes. Press <Enter> to print the forms.
| • | You must print W-2s and a W-3 to a printer setup in Company information. |
| • | If you are using a laser printer, load the report forms in the printer’s paper tray according to the instructions in the printer’s user manual. The program will set your laser printer to print 60 lines. If not, set it to 60 lines and when you have finished printing W-2s, you may have to set it back to 66 lines. |
| • | You may be asked to select a printer, and allowed to print one or more alignment forms. With a laser printer you can fine-tune the horizontal and vertical alignment via screen entries. You can economize on the expensive forms by using plain paper for the alignments. Sandwich the result to a W-2 form and hold up to a bright light. |
| • | If you are using a laser printer for single-width W-2 forms, before printing you will be asked to enter the number of copies. |
| • | You will be asked to mount the forms before, and to un-mount them after, printing occurs. In each case you must confirm this by typing DONE. |
| • | After entering additional federal information for an employee, the boxes with Federal amounts will be blank on the form when printing state information. |
| • | When you select to print state only W-2s if you select to print a W-3 only the state information will print on the W-3. |
| • | When printing state information, there can be 2 lines printed. The state wages with tips and income tax amounts print on the upper line of box 15, 16 and 17 and the additional box 15 text, if entered, prints on the lower line. See 8. User defined W2 box 15 text. |
| • | If you are using a dot matrix printer, mount the W-2 forms on the printer so that the print head is at the top of the form. Adjust the printing pressure according to the thickness of the forms. If there are two W-2 forms on each page, the first actual W-2 form printed should be the first one on the page. Therefore print sufficient alignment forms so that the first actual W-2 report printed appears on the first form of a page. |
For details on all this, and further information on the capabilities of laser printers, refer to the Starting PBS, Menus and Printing chapter of the System User documentation.
The information used for printing W-2 forms is available until Close a year is run, at which time the information is purged from the payroll system. You do not have to close the year until you are ready to enter payroll for the first check run in April (after March 31).
When you file paper W-2 forms, you must also file a W-3 that summarizes the information on the W-2s.
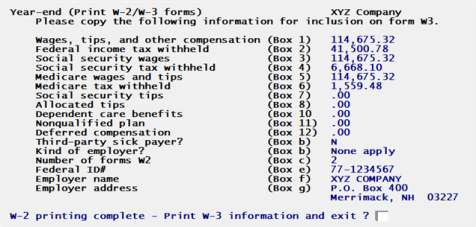
A totals screen displays when the W-2s have finished printing. If you printed a W-3 the information on this screen will match the data on the form.
You may select <Ctrl+P> to print this screen in Windows. Using Linux you may select <Ctrl + F10> to print this screen. You may choose to use this information as an aid in filling out your W-3 form manually.
Print W-3 information and exit ?
If you selected to print W-2s only in the 11. Forms to print ? field, you are offered an option to print a W-3 from the grand totals screen as seen here:
. 
If you selected to print State information only the Federal totals will not display and will not print on a W-3.
Enter Y to print a W-3 or enter N or the Esc key to exit without printing a W-3.
This selection writes W-2 information to a file on your hard disk. It must be run in order to electronically submit a formatted wage file to the Social Security Administration.
If you inputted additional information for each employee we recommend that you run and review Print W-2 information, described in Printing W-2 Information, before proceeding. You may also want to review the Year-end payroll report. See Printing a Year-End Payroll Report.
In the federal tax table, verify that the Maximum Social Security Wages is set to the amount for the tax year that you are processing W-2s. If the maximum was not set properly throughout the reporting year and you have at least one employee that reached the maximum, you will have to enter and post an adjustment for each employee that reached the maximum to make the amounts accurate. Testing the wage file using AccuWage will find the difference.
Verify that the employees are entered per the Employee Name Format as described in the Employees chapter.
You must first enter Jurisdiction ‘RA’ and ‘RE’ information before you run this selection. See the Jurisdictions chapter.
This process produces a file. After running this selection and before submitting the file, process the file using the AccuWage program, provided by the Social Security Administration. Go to socialsecurity.gov/employer/accuwage/.
Select
Magnetic W-2 forms from the Year-end menu.
The following screen displays:
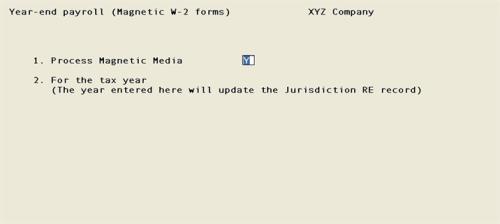
1. Process electronic wage file ?
Answer Y here if you want to process your formatted wage file or answer N if you do not.
|
Format |
One letter, either Y or N. |
2. For the tax year
Enter the tax year or accept the default as entered in the Jurisdictions RE record. If you change the year then it will write the change to Jurisdictions.
The year entered should match the year in Payroll Control information. Do NOT change the date in Control information. That will happen when you close the payroll year. If you change it you will only be able to report on the current or just completed tax year.
|
Format |
CCYY |
Field number to change ?
Make any needed change. Press <Enter> to create your formatted W-2 wage file. The Passport Business Solutions Printer selection screen will display.
Select a printer destination for the Mag W-2 Summary/Exception Report. If an Exception report prints you must read the report and correct the errors and run this process again. If the Summar prints you may use this for review and to verify totals.
As W-2 records are written to a file on your disk, the program checks the social security number, state code, and zip code for each employee. If the program finds an error, that employee is reported on an exception report. This enables you to get the social security number, state code, or zip code for each employee who appears on this report quickly corrected.
Also, if the program finds errors, the W2REPORTxx file containing your W-2 report is not produced. All errors must be corrected before the program produces this file.
A summary screen shows information on who submitted the file, who the employer is, and totals for the amounts reported.
Optionally, you can print this screen if you want to save a copy of the displayed information. Press <ESC> to exit this screen.
Another screen displays that provides the name of the file that was created.
Press <ESC> to exit this screen. You must do this before you may open the W2REPORTxx file.
If no errors were encountered during processing, a file named W2REPORTxx is created on your hard drive. This file contains the formatted W-2 data that you submit to the Social Security Administration. This is an explanation of the file name:
|
W2REPORTxx |
The W2REPORT part of the file name is the same for each PBS company. The xx part of the file name matches the company ID from which the output was run. |
When filing electronically via the Internet, you can send the complete file as is. You must obtain a Transmitter Control Code to file electronically.
The Social Security Administration no longer accepts magnetic tapes, cartridges, or 3 1/2" diskettes. All wages must be filed either electronically or on paper.
Check your wage reporting output with the AccuWage test tool prior to submitting. It allows you to check wage reports for correctness before you send them to the Social Security Administration.
The file containing the W-2 information must be sent to the Social Security Administration. Refer to www.ssa.gov.gov web site for additional information on submitting your W-2 file and when it is due. Read the instructions on uploading a formatted wage file. Filing requirements may change at any time. We recommend that you contact the Social Security Administration for the up-to-date requirements prior to submitting your formatted W-2 wage file.
The W2REPORTxx file is generated in the top-level PBS folder. After generating the W2REPORTxx file, move it to a secure location for these reasons:
| • | This file contains sensitive wage information about each employee. |
| • | This file contains social security numbers which could be used for identity theft. |
This option allows you to enter 1099 information for each non-employee. A non-employee is an employee in the sense that there is an entry for him in the Employees selection, but this entry’s Employee type code is N. Often these people are contractors or consultants whom you have chosen to pay through the Payroll system as a matter of convenience (instead of treating them as vendors, or cutting purchase orders for their services). Although non-employees are responsible for their own taxes, to prevent tax evasion the federal government requires you to report all such employees (above a certain earnings threshold, which may vary from year to year).
If you have no such employees, you can skip this section.
To enable you to effectively use the payroll system for 1099 reporting, this function allows you to record additional non-employee information in a temporary file so that it is available to the 1099 reporting functions.
The entry screen contains information entry fields that correspond to the 1099 form by box number. Refer to the Federal reporting instructions for filling out W-2 forms for information on each of these fields. The instructions refer to these fields by referencing the 1099 box number. Each field on the screen is followed by the corresponding 1099 box number.
Include 1099 Payroll Non-employees with Accounts Payable
This only applies if you have the Accounts Payable module installed. It also only applies if the vendors in Accounts Payable and non-employees in Payroll are paid by the same company using the same EIN number.
As the Accounts Payable module provides complete reporting for all 1099 MISC types, including the printing of 1099 MISC forms, the 1096 form and generating 1099 MISC magnetic media, you may want to add the Payroll non-employees to Accounts Payable and generate your year-end reporting there. To do this, you may enter your Payroll non-employees info A/P Vendors (Enter) and use 1099-MISC reporting info to enter override Non-employee compensation amounts for each non-employee. This data will be included when generating the 1099 year-end reporting in Accounts Payable. The data will be summarized properly on the 1096 form and in the 1099 magnetic media electronic file.
If you need to run this function, start as follows:
Select
Enter 1099 information from the Year-end menu.
A screen similar to the following appears:
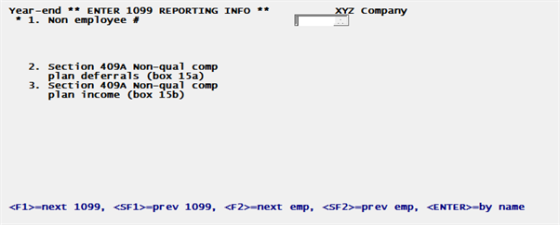
From this screen you can work with both new and existing 1099 information records. If one has already been entered for the non-employee number you specify, it displays and is available for changes or deletion.
Enter the following information.
* 1. Non-Employee #
For a new 1099 information record
Options
Enter the number of the non-employee for whom to enter 1099 information or use one of the options:
|
<F2> |
For next non-employee, in employee number sequence |
|
<SF2> |
For previous non-employee |
|
Blank |
To look up non-employee by name |
If you choose to enter by name, the cursor moves to the name field and lets you enter a non-employee name (or just the leading characters of one). Upper / lower case is significant. Your options at this point become:
|
<F2> |
For next non-employee, in employee name sequence |
|
<SF2> |
For previous non-employee |
|
Blank |
To return to looking up non-employee by number |
The non-employee entered must exist in Employees and must also have been paid at least one check during the year.
The 1099 forms cannot be printed for regular salaried or hourly employees. If you enter the number of a regular employee, an error message displays.
For an existing 1099 information record
Options
Enter the non-employee number whose 1099 information you want to change or delete, or use the option:
|
<F1> |
For next entry |
|
<SF1> |
For previous entry |
|
Format |
999999 |
|
Example |
Type 1 |
2. Section 409A Non-qual comp plan deferral (box 15A)
This field is for reporting the section 409A non-qualified compensation plan deferral amount.
Enter the dollar amount.
|
Format |
999999999.99 |
|
Example |
Press <Enter> |
Refer to the IRS publications on reporting 1099’s for more information.
3. Section 409A Non-qual comp plan income (box 15B)
This field is for reporting the section 409A non-qualified compensation plan income amount. For more information see the previous field and refer to IRS publications on reporting 1099 information.
Enter the dollar amount.
|
Format |
9999 999.99 |
|
Example |
Press <Enter> |
Field number to change ?
Options
Enter the field number for which you want to change a field or use one of the options:
|
<F3> |
To delete the entry (this is only available if the selection had previous been saved. |
|
<Enter> |
To save a new record, save the changes or retain the existing record. |
This option prints 1099 information for each non-employee.
If you have no entries in Employees with the employee type non-employee, skip this section.
We recommend that you run this selection and review the resulting report before producing the 1099 forms (either as physical reports or before filing electronically).
Select
Print 1099 information from the Year-end menu.
Starting employee and
Ending employee
Options
Enter the range of employee numbers for whom to print 1099 information, or use the option:
|
<F2> |
For the First or Last employee number |
|
Format |
9999 at each field |
Minimum 1099 reportable amount required
Enter the threshold amount for annual non-employee gross earnings. You are required to include on the 1099 report all non-employees who earned more than this threshold.
All non-employees are included on the report, even those below the threshold. The ones below the threshold are marked with asterisks so you can review them. They will not be included in the 1099 forms themselves (either on paper or when filing electronically).
|
Format |
99999999.99 |
|
Example |
Type 600 |
Any change ?
Answer Y to re-enter the screen, or N to print the 1099 Information Report.
If you have no entries in Employees with the employee type non-employee, skip this section.
The Print 1099 Information section explains non-employees. We recommend that you run that selection, and review the resulting report, before running this one.
1099’s , like W-2’s, can be printed either as paper documents or generated as a file to be submitted electronically. This section deals only with paper. The next section describes generating an electronic file.
Select
Print 1099 forms from the Year-end menu.
A screen displays for you to enter the following:

Starting employee and
Ending employee
Options
Enter the range of non-employee numbers for whom to print 1099 form information, or use the option:
|
<F2> |
For First (at Field #1) or Last (at Field #2) employee number |
|
Format |
9999 at each field |
Minimum 1099 reportable amount required
Options
You are required to print the 1099 forms for all non-employees who earned more than this threshold. Enter the threshold amount for annual gross non-employee earnings or use the option:
|
<F2> |
For the default of $600 |
|
Format |
99999999.99 |
|
Example |
Select <F2> for default |
If no valid non-employees have a dollar amount in the "YTD Gross" field of at least the minimum reportable amount, you see "No valid non- employees on file".
Payor’s phone number
Enter a phone number where the IRS can reach you.
|
Format |
15 characters. The default is your corporate phone number from Company information. |
Any change ?
Answer Y to re-enter the screen, or N to print the forms.
If there are no non-employees who meet the threshold amount, nothing is printed and you are told No valid non-employees on file.
It is recommended that you select a Company information printer when printing 1099’s.
When using a dot matrix printer, mount the 1099 forms on the printer, aligning the perforation at the top of the forms with the print head. It is important to start the actual forms from the top of the page, and to do the printing with a carbon-based black ink ribbon. The matrix size must be 7_ 9 per character. The IRS requires this for their forms scanner. Adjust the printing pressure according to the thickness of the forms.
If you are printing to a laser printer you may print an alignment. Follow the screen instructions and print enough alignment forms to bring the paper forms to the top of a page. If you are using a laser printer, each alignment form is automatically ejected from the printer.
When the alignment is correct, and the next form to print is also the first form on the page, answer N to the alignment question and the 1099 forms print.
After the forms are printed, a summary information screen displays to show the grand totals. You can print this by using <Ctl+P> in Windows and <Ctl+F10> in Linux.
If you have no entries in Employees with the employee type non-employee, skip this section.
Magnetic media is handled a little differently for Windows vs. Linux.
1099-MISC reports are written to a disk file named IRSTAXxx (no extension), with the xx representing your PBS Company ID. You are asked for the disk drive letter of the disk to which the IRSTAXxx file is written. As social security numbers are likely to be in this file, to avoid identity theft, it is highly recommended that you store the file in a secure location.
We strongly recommend that you make three copies of this file: one to send to the IRS, another as an archive, and the third for a working copy for reference should the IRS have questions about your 1099-MISC reports.
Do not report 1099-MISC forms electronically using both Payroll and Accounts Payable unless separate and distinct taxpayer identification numbers are used, one for Payroll and a different one for Accounts Payable.
1099-MISC reports are written automatically to your hard disk to the current directory. You are asked for the disk drive as described above only when you are running Windows.
We strongly recommend that you make three copies of this file: one to send to the IRS, another as an archive, and the third for a working copy for reference should the IRS have questions about your 1099-MISC reports.
Do not report 1099-MISC forms electronically using both Payroll and Accounts Payable unless separate and distinct taxpayer identification numbers are used, one for Payroll and a different one for Accounts Payable.
Select
Magnetic 1099 forms from the Year-end menu of the Payroll menu.
The following screen displays:
Enter the information as follows:
1. Enter 4 digits of payment year
Enter the year for which 1099 forms are being produced.
|
Format |
9999 |
2. Taxpayer identification #
Options
Enter the ID number of the taxpayer, or use the option:
|
<F2> |
For the ID number in the Federal entry of Tax tables (provided its format is valid) |
|
Format |
999999999 |
3. Transmitter control code
Enter your company’s control code. This field is required. The code is supplied to you by the IRS.
|
Format |
Five characters. All five must be present (no spaces allowed) |
4. Company name
Options
Enter the company’s name. This field is required. You may use the option:
|
<F2> |
For the company display name in Company information |
|
Format |
40 characters |
5. Address
Options
Enter the company’s address. This field is required.
|
Format |
40 characters |
6. City
Enter the company’s city. This field is required.
|
Format |
25 characters |
7. State
Enter the employer state. This is required, and must be a valid U.S. Post Office abbreviation for a state or territory. Canadian provincial abbreviations or other foreign designation are not accepted.
|
Format |
Two characters |
8. Zip code
Enter the company’s zip code. Canadian or other foreign postal codes are not permitted. It may be in two segments.
|
Format |
99999 in the first segment. This segment is required, and all five digits must be entered. 9999 in the second segment. This segment is optional, but if present all four digits must be entered. |
9. Contact name
Enter the contact name.
|
Format |
Up to 40 characters |
10. Contact phone number
Enter the contact phone number.
The phone number is four separate fields. They include area code, exchange, number and extension.
|
Format |
Area code - three digits Exchange - three digits Number - four digits Extension - five optional digits. The extension is optional |
11. Contact email address
Enter the senders email address. This field is optional, but recommended if there is one available.
|
Format |
Up to 50 characters |
12. Minimum 1099 reportable amount required
You are required to create 1099 magnetic media for all non-employees who earned more than this threshold. Enter the threshold amount for annual gross non-employee earnings or use the option:
|
<F2> |
For the default of $600 |
|
Format |
99999999.99 |
|
Example |
Select <F2> for default |
Field number to change ?
Make any needed changes. Press <Enter> to create the file.
You are asked for the printer on which the Magnetic 1099 Exception Report is to be printed. This is an audit trail report and may not be directed to the monitor, but may be spooled to disk.
The 1099-MISC forms are then written to the disk drive selected. The screen displays the number of the payee whose 1099-MISC form is being written out.
While Processing Is Occurring
As 1099 forms are written to disk, the program checks the taxpayer identification number (TIN), state code, and zip code for each payee getting a 1099. If the program finds an error, the information for that payee is reported on an exception report. This enables you to get the TIN, state code, or zip code for each payee who appears on this report quickly corrected.
If the program finds any errors, the IRSTAX file containing your 1099 reports is not produced. All errors must be corrected before the program produces this file.
Under Windows
If you selected a hard disk, enter DONE at this point.
Using a Linux Server
You will not be asked for a drive letter when creating the file.
For all operating systems
After IRSTAX has been created, a summary information screen displays to show the grand totals. The same information prints on the exception report.
This screen may be printed in Windows by selecting <Ctl+P> and then select a Windows printer.
In Linux select <Sft+F10> to print the screen to the first printer entered in Company information.